Friday, September 26, 2014

Dynamic Stretching for Runners

Michael Conlon
Most of us grew up learning static stretches with a prolonged hold: stretch your quad by bending your knee and bringing your foot to your butt. Stretch your hamstrings by bending at the hips and touching your toes. Hold for 20 seconds.

It’s not that static stretching is bad; any form of stretching is better than not doing it at all. However, three-dimensional stretches are far more effective in improving flexibility and joint mobility. Why? Active, dynamic stretches that take your body through all planes of motion introduce movement, which increases circulation to loosen up your body before a workout and to prevent stiffness and expedite recovery post-workout.       

Humans are multi-dimensional beings, and our natural movements obviously reflect that. So when we say “three planes of motion,” we’re referring to the sagittal plane (forward and back), frontal (side to side) and transverse (rotation).

Dynamic stretches are more functional because they mimic the natural way we move in all of these directions when walking and running. For example, when we run, as the right leg hits the ground, the joint and muscles move through all three planes of motion, accelerating and decelerating as needed.

3D dynamic stretching also enables you to increase your capacity. There’s the range of motion you have and the amount that you need for a particular activity (like running) – but why not give yourself more? Dynamic stretching allows you to create greater movement than what is essential for running, which gives you more of a buffer zone.

Lunge Matrix
One of the best self-assessment dynamic stretches you can do is the Lunge Matrix. It’s a perfect warm-up because it allows you to move through all planes of motion and actually feel if there are areas you need to spend more time stretching. Here’s how you do it:

Part 1: Position in a forward lunge on one side, driving your weight onto your front leg. Reach your arms down and touch your toes – making sure to bend at the front of your hip and driving through your big toe to engage your glutes – then extend your arms over your head. While still in a lunge, go into a sidebend, reaching arms laterally to the right, then to the left. Finally bring your arms down to shoulder length and rotate to the right, then to the left. Repeat that on the other leg.

Part 2: Position in a lateral lunge and repeat the sequence with your arms: reach down and touch your toes then extend arms overhead; sidebend and reach arms laterally to the right, then the left; bring arms to shoulder length and rotate to the right, then to the left. Repeat that on the other leg.

Part 3: Position in a backwards rotational lunge, towards the leg you stepped with. Your toes will be pointed out away from each other. Repeat the sequence with your arms in all three planes, then repeat on the other leg.

Click HERE to view a video demonstration.

* TIP: Make sure you’re feeling the different parts of your hip engage with each lunge position, as opposed to feeling it in your knees or just reaching with your arms.

Dynamic Stretches for Key Muscle Groups
In addition to the Lunge Matrix, here are dynamic stretches for key muscle groups that are essential for runners to perform at their best. Remember: only stretch areas that feel tight! You might think that, because we’ve given you six stretches, you have to do each of them every time you go out for a run. You don’t. Pay attention to your body and address areas that need it.

3D Standing Hip Flexor Stretch
Standing with one foot propped up on a coffee table / chair / park bench and left leg extended behind you. Squeeze glutes and tuck hips under as you drive hips forward and bring your arms overhead and back - 10x. Repeat with arms overhead reaching side to side - 10x. Repeat with arms in front rotating - 10x. Stretch both legs.

Click HERE to view a video demonstration.

* TIP for all hip flexor/quad stretches: Make sure you’re reaching up to the ceiling with arms touching your ears (or as close as possible), concentrating on staying vertical throughout the motion to feel an increased stretch. It’s one of the first things we let slack when performing the motion, so be aware of it throughout all repetitions!

3D Kneeling Hip Flexor Stretch
Half kneeling position with one knee on a cushion and the other knee bent in front. If you’re in the park, head to a grassy area that offers a softer surface. Squeeze glutes and tuck hips under as you drive hips forward and bring your arms overhead, extending through kneeling hip - 10x. Repeat with arms overhead reaching to the side away from your kneeling leg - 10x. Repeat with arms in front rotating away from your kneeling leg - 10x. Stretch both legs.

Click HERE to view a video demonstration.

3D Quad Stretch
Using pillow or cushion for extra support, bend one knee up against wall or couch. Tucking hips under you, reach arm on same side overhead and drive hips forward - 10x. Then reach hand overhead and to opposite side (side-bending motion) - 10x. Then reach arm overhead and rotate shoulder around to opposite side - 10x. Stretch both sides and switch legs.

Click HERE to view a video demonstration.

3D Hamstring Stretch
Place foot up between knee and hip height (a chair, coffee table or park bench works well). Make sure your hips are facing forward. Lean trunk and shoulders gently forward into stretch (keeping back straight) as you reach in front of you - 10x. Repeat with trunk and shoulders rotated towards stretching side - 10x. Stretch both sides and switch legs.

Click HERE to view a video demonstration.

* TIP: For the leg you have extended (and are stretching), make sure the knee is slightly bent to take the pressure off your sciatic nerve. You can also rotate your leg inward to feel the stretch more fully.

3D Standing Adductor (Inner Thighs) Stretch
Position yourself so that a coffee table / chair / park bench is next to you. Place your foot on the surface, pointed straight out, and your knee bent at a 90-degree angle. The opposite foot is on the ground pointing forward. Move your body towards the leg that’s on the stool to stretch the muscles of the inner thigh while extending arms overhead - 10x. While continuing to drive hips to the side, reach arms side to side - 10x. Still driving hips to the side, extend arms overhead and rotate torso - 10x. Switch legs and repeat.

Click HERE to view a video demonstration.

3D Calf Stretch
Stand with foot back in a lunge stance. Lean hips and trunk forward into stretch - 10x - making sure to keep your back heel down. Repeat moving hips and trunk side to side - 10x. Repeat rotating hips and trunk around towards stretching side (use alternate foot) - 10x. Stretch both sides and switch legs.

Click HERE to view a video demonstration.

Blogmaster's Note: Michael Conlon is the founder and owner of Finish Line Physical Therapy, which he opened in 2006 to provide the highest quality of care, service, and personal attention in a comfortable, supportive, and friendly atmosphere. He has been a New York State licensed physical therapist since 1997. He is a certified full-body Active Release Techniques provider and is recognized as a Fellow of Applied Functional Science (FAFS) through the internationally acclaimed Gray Institute. He is passionate about endurance sports, both as a participant and coach, and has run 23 marathons and completed three Ironman triathlons. As a coach for the NYC chapter of the Leukemia and Lymphoma’s Team in Training program since 2002, Michael has trained hundreds of runners, from beginners to advanced marathoners.


Read more...

Thursday, September 18, 2014

Three Bridges Run – Behind the Scenes or “Please volunteer for Three Bridges Run #2”

Linda C
You’ve probably heard about the Flyers’ Three Bridges Run. It’s the Flyers 20-mile long training run that takes runners over three bridges: the Brooklyn Bridge, Pulaski Bridge, and Queensboro Bridge. Bag check is provided, runners are divided into pace groups, and there are pacers and fluid stations. Just how do these runs come together? Well, now that Three Bridges Run #1 is done for this year and we’re gearing up for Three Bridges Run #2, I’m going to give you a brief look into what takes place to make the run happen. Please volunteer for Three Bridges Run #2.


The Flyers holds two Three Bridges Runs and the idea is to plan them at a time that works with most fall marathon training schedules. I don’t know who planned the first Three Bridges Runs for the Flyers (Blogmaster's Note: It was Glen W as confirmed by Lara K), but we’ve built upon those original runs every year. I organized this year’s and last year’s runs and planned the runs on the same weekends as previous years, so September 7th and October 11th were chosen as the days for this year’s runs. The dates were run by the Executive Board for good measure and our hosts, the New York Running Company, and then the dates were announced on the Flyers’ website. This year, the Executive Board also discussed and approved an increase in the fee for non-Flyers-members to sign-up for the runs. The Flyers web gurus then set up the sign-up pages for runners and volunteers. Please volunteer for Three Bridges Run #2.


Once the sign-up pages for the runs were on the Flyers’ website, runners start signing up for the run. A separate volunteer registration webpage was also set up and some of our long-time Flyers members who have volunteered in previous years signed-up to volunteer to staff the fluid stations along the course or to pace. From the time the sign-up pages are set up, I began to almost compulsively check runner and volunteer sign-ups. Then the questions start: Will we have enough pacers? Will we have people to staff the fluid stations???? Does anyone really run a training run at 7:30 minutes/mile pace? Luckily I internalized all these questions or I’d be institutionalized. Please volunteer for Three Bridges Run #2 – and we will need a 7:30 minutes/mile pacer!!!


I still had to tweak the course map!  Since last year’s runs, the New York Running Company’s east side store moved locations a few stores down from the store’s previous location. It should have been fairly easy to adjust last year’s east side course map for the new store location, but that’s when I found I had not saved last year’s east side course map! I had saved the map of the course that started from New York Running Company’s west side store. It should be easy to adjust the map for the different start/stop location, right? Well, not as easy as one would like especially not as easily as I would like. I made adjustments, but then runners wouldn’t cross the Queensboro Bridge until mile 18 – that wasn’t going to work. Please volunteer for Three Bridges Run #2.

The idea is to have the runners cross the Queensboro Bridge at the same mile as they would, if they were running the New York City Marathon, so between Mile 15 and Mile 16. The Susan G. Komen Race for the Cure was scheduled for the same day as Three Bridges Run #1. I had to check their course and start time to make sure that would not interfere with our runners – it looked like we’d be okay, that run would not start until later. The course map was then set. Ugh, we still needed more pacers. I sent e-mails to all the Flyers signed up to run the race pleading for volunteers to pace. The e-mail helped to generate more volunteers, but we still needed more pacers. We needed at least one, but ideally at least 4 pacers, for each pace group. My fingers were crossed for more volunteers. Please volunteer for Three Bridges Run #2.

The run was getting closer, and then it happened… Ed A who usually volunteers to coordinate the fluid stations was not going to be available for Three Bridges Run #1!!! Uh-oh, I needed to find someone to step in to that position. That someone needed to be able to drive to help set up and tear down each fluid station and deliver the water, Gatorade, and energy gels to each fluid station. Theoretically, I could do it (get someone else at the store to help with the sign-in and baggage check), but I’ve driven only once since I’ve gotten my driver’s license. Yes, it’s been over 10 years, but I don’t drive and taking the subway and city buses to the fluid stations wasn’t going to work.  Maybe it was the long-run god or Pheidippides, but Richard B volunteered to coordinate the fluid stations!  Richard got to work and quickly moved fluid station volunteers around to make sure we had volunteers for each of the three locations (in lower Manhattan, Brooklyn, and Queens). And, we still needed more pacers. I then started sending e-mails to Flyers signed up for specific paces for which we still needed pacers. That helped and we got more volunteers. Please volunteer for Three Bridges Run #2.

As the run approached, I sent e-mails to runners and pacers with information they would need for the day of the run. I also had to field questions for runners. The weekend before the run, I ordered water and Gatorade to be delivered to the New York Running Company. Implementing some suggestions from last year, I asked Naomi R to help come up with a navigational pointers sheet for the pacers, which I printed to hand-out to the pacers on the day of the run, and I printed out back-bibs for the pacers, so that they could easily be identified. Please volunteer for Three Bridges Run #2.


We still needed more pacers and I started getting e-mails from pacers who had to pull-out due to injury or work commitments. More e-mails to Flyers signed up for the run with pleas to please volunteer to pace. Please volunteer for Three Bridges Run #2.

The night before the run, more e-mails to pacers with last minute information…. Uh-oh, I got a reply from David F (a Flyers member and one of the pacers) – the Century Bike Tour was also going to be tomorrow! Argh! What’s their course? I was madly Google-ing and reading their website, reviewing Map My Ride course maps– 100 miles with two start locations and some overlap with the Flyers’ Three Bridges Run course. Okay, no course adjustments needed, but the pacers and fluid station volunteers needed to know – more e-mails. Please volunteer for Three Bridges Run #2.


The day of the run, I arrived at the New York Running Company’s east side store at 6AM. The store was open and Richard B was already there loading up the van with Gatorade. Andrea M, who was helping out with the sign-in and baggage check, soon arrived and we set-up for the runners. The runners and pacers started to file into the store signing in and checking their bags. Every 15 minutes beginning at 6:30, we sent waves of runners out and on their way. All the pacers made it and soon it was 7:30 and the last of the runners were off. We set out the water for the runners’ return and Andrea and I left the store to return later around 9:15, when we could expect the first of the runners to return to the store. Please volunteer for Three Bridges Run #2.


The runners and volunteers soon returned to the store and the New York Running Company had purchased some post-run snacks (mini cupcakes and KIND bars) and coffee for the returning runners. It was great to hear what all the runners and volunteers had to say. There were some suggestions for course adjustments and reports on the fluid stations (some ran out of water – sorry about that!). All the runners and volunteers seemed to have had a good time. The New York Running Company gave all the runners a discount for the day and it was a long morning (especially for the weekend), but it all seemed worth it. The run was successful and it was all due to our great team members who volunteered to help make the run come together. I hope you join us on the Three Bridges Run #2 on October 11th and  Please volunteer for Three Bridges Run #2.

Blogmaster's Note: Rumor has it that volunteers are needed for Three Bridges Run #2.  To sign up to volunteer, please click HERE :)


 -Linda C

Read more...

Friday, September 12, 2014

Exploring Highbridge Park

Exploring Highbridge Park


 by Papa Bear


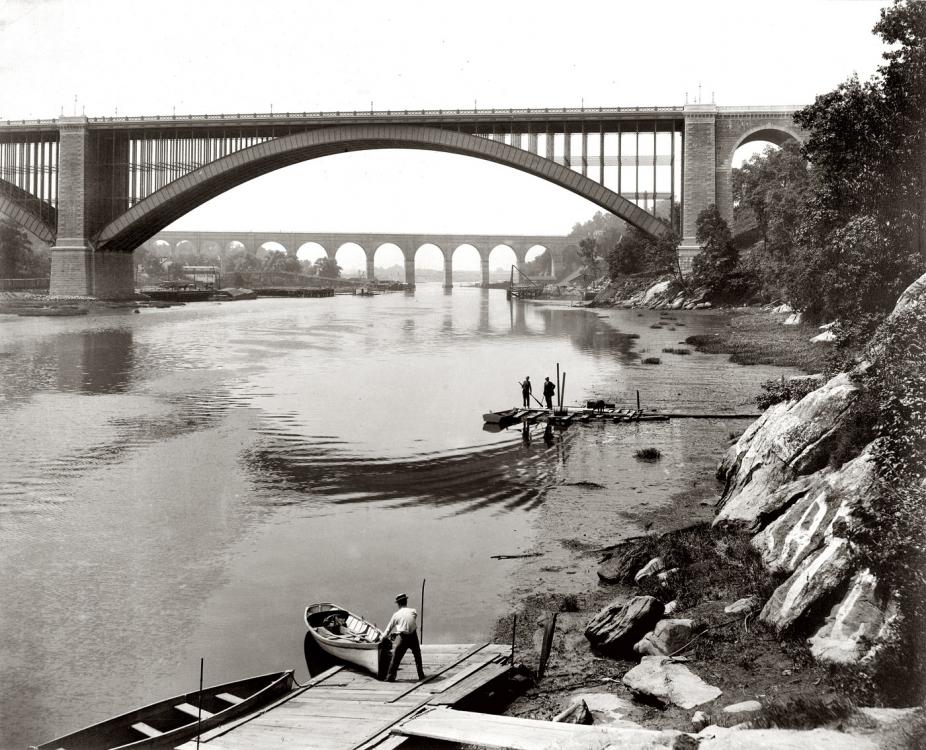
The Harlem River circa 1888 with the Washington Bridge and High Bridge

I've been running — and walking — in Highbridge Park literally for years. I recall back sometime in the late 1960s or early '70s, walking with a couple of friends from work the length of the Old Croton Aqueduct (aka the "OCA") from Croton to New York and having to stop at the Bronx end of the High Bridge, which even then was fenced off. We somehow found our way back to the Washington Bridge, crossed over to Manhattan and eventually found the OCA again down the stairs from Highbridge Tower. 


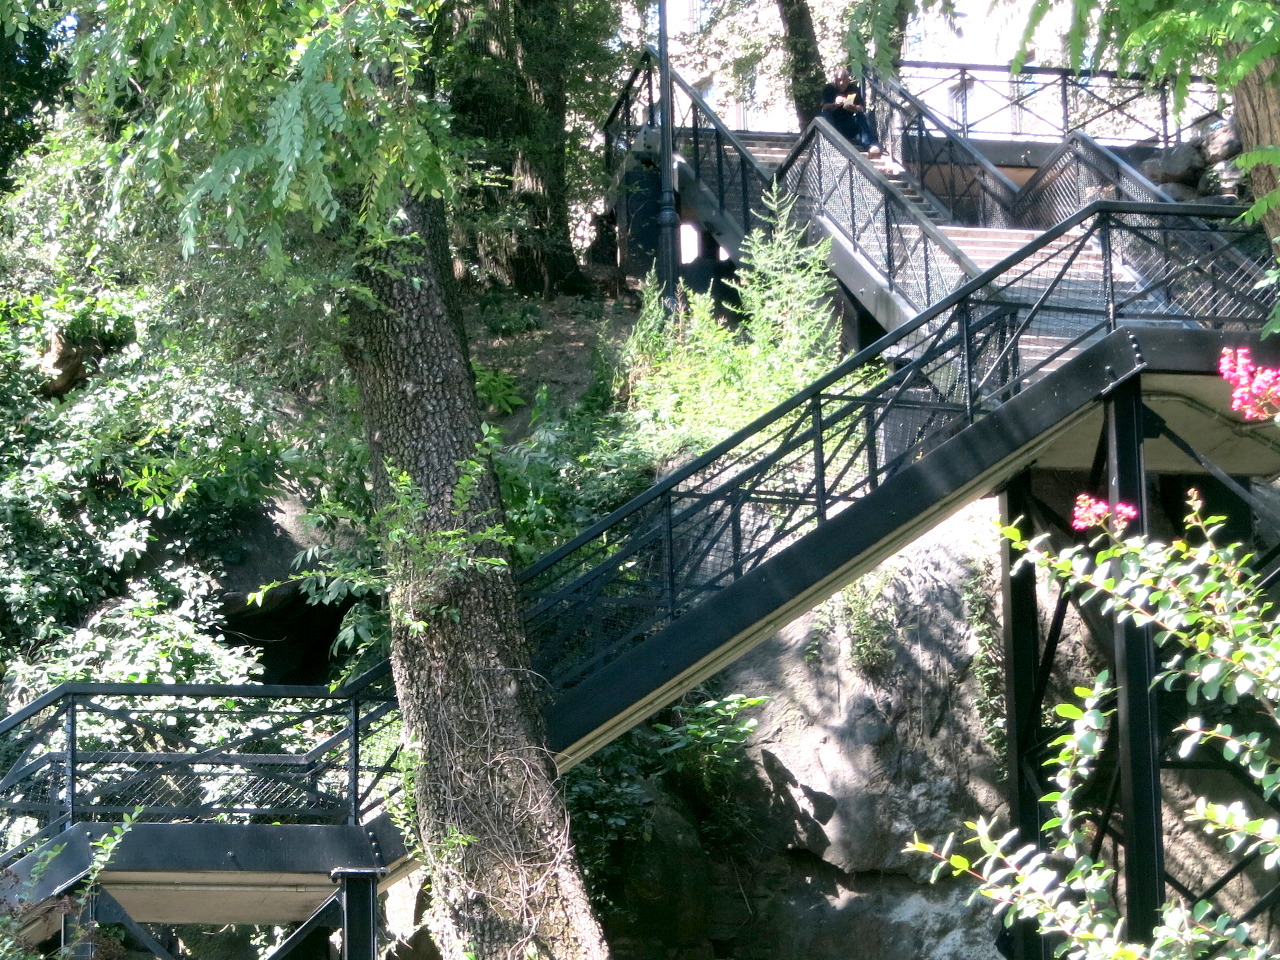
As for running, I recall running along the OCA with Susan and finding a path up from the end of the High Bridge to Amsterdam Avenue. Eventually we discovered the ornate staircase on Laurel Hill Terrace which led down to a park road which took us all the way to the north end of the park. This was our original "High Road". This route was featured in my 2011 report From Carl Schurz Park to Wave Hill, one of our better runs.  


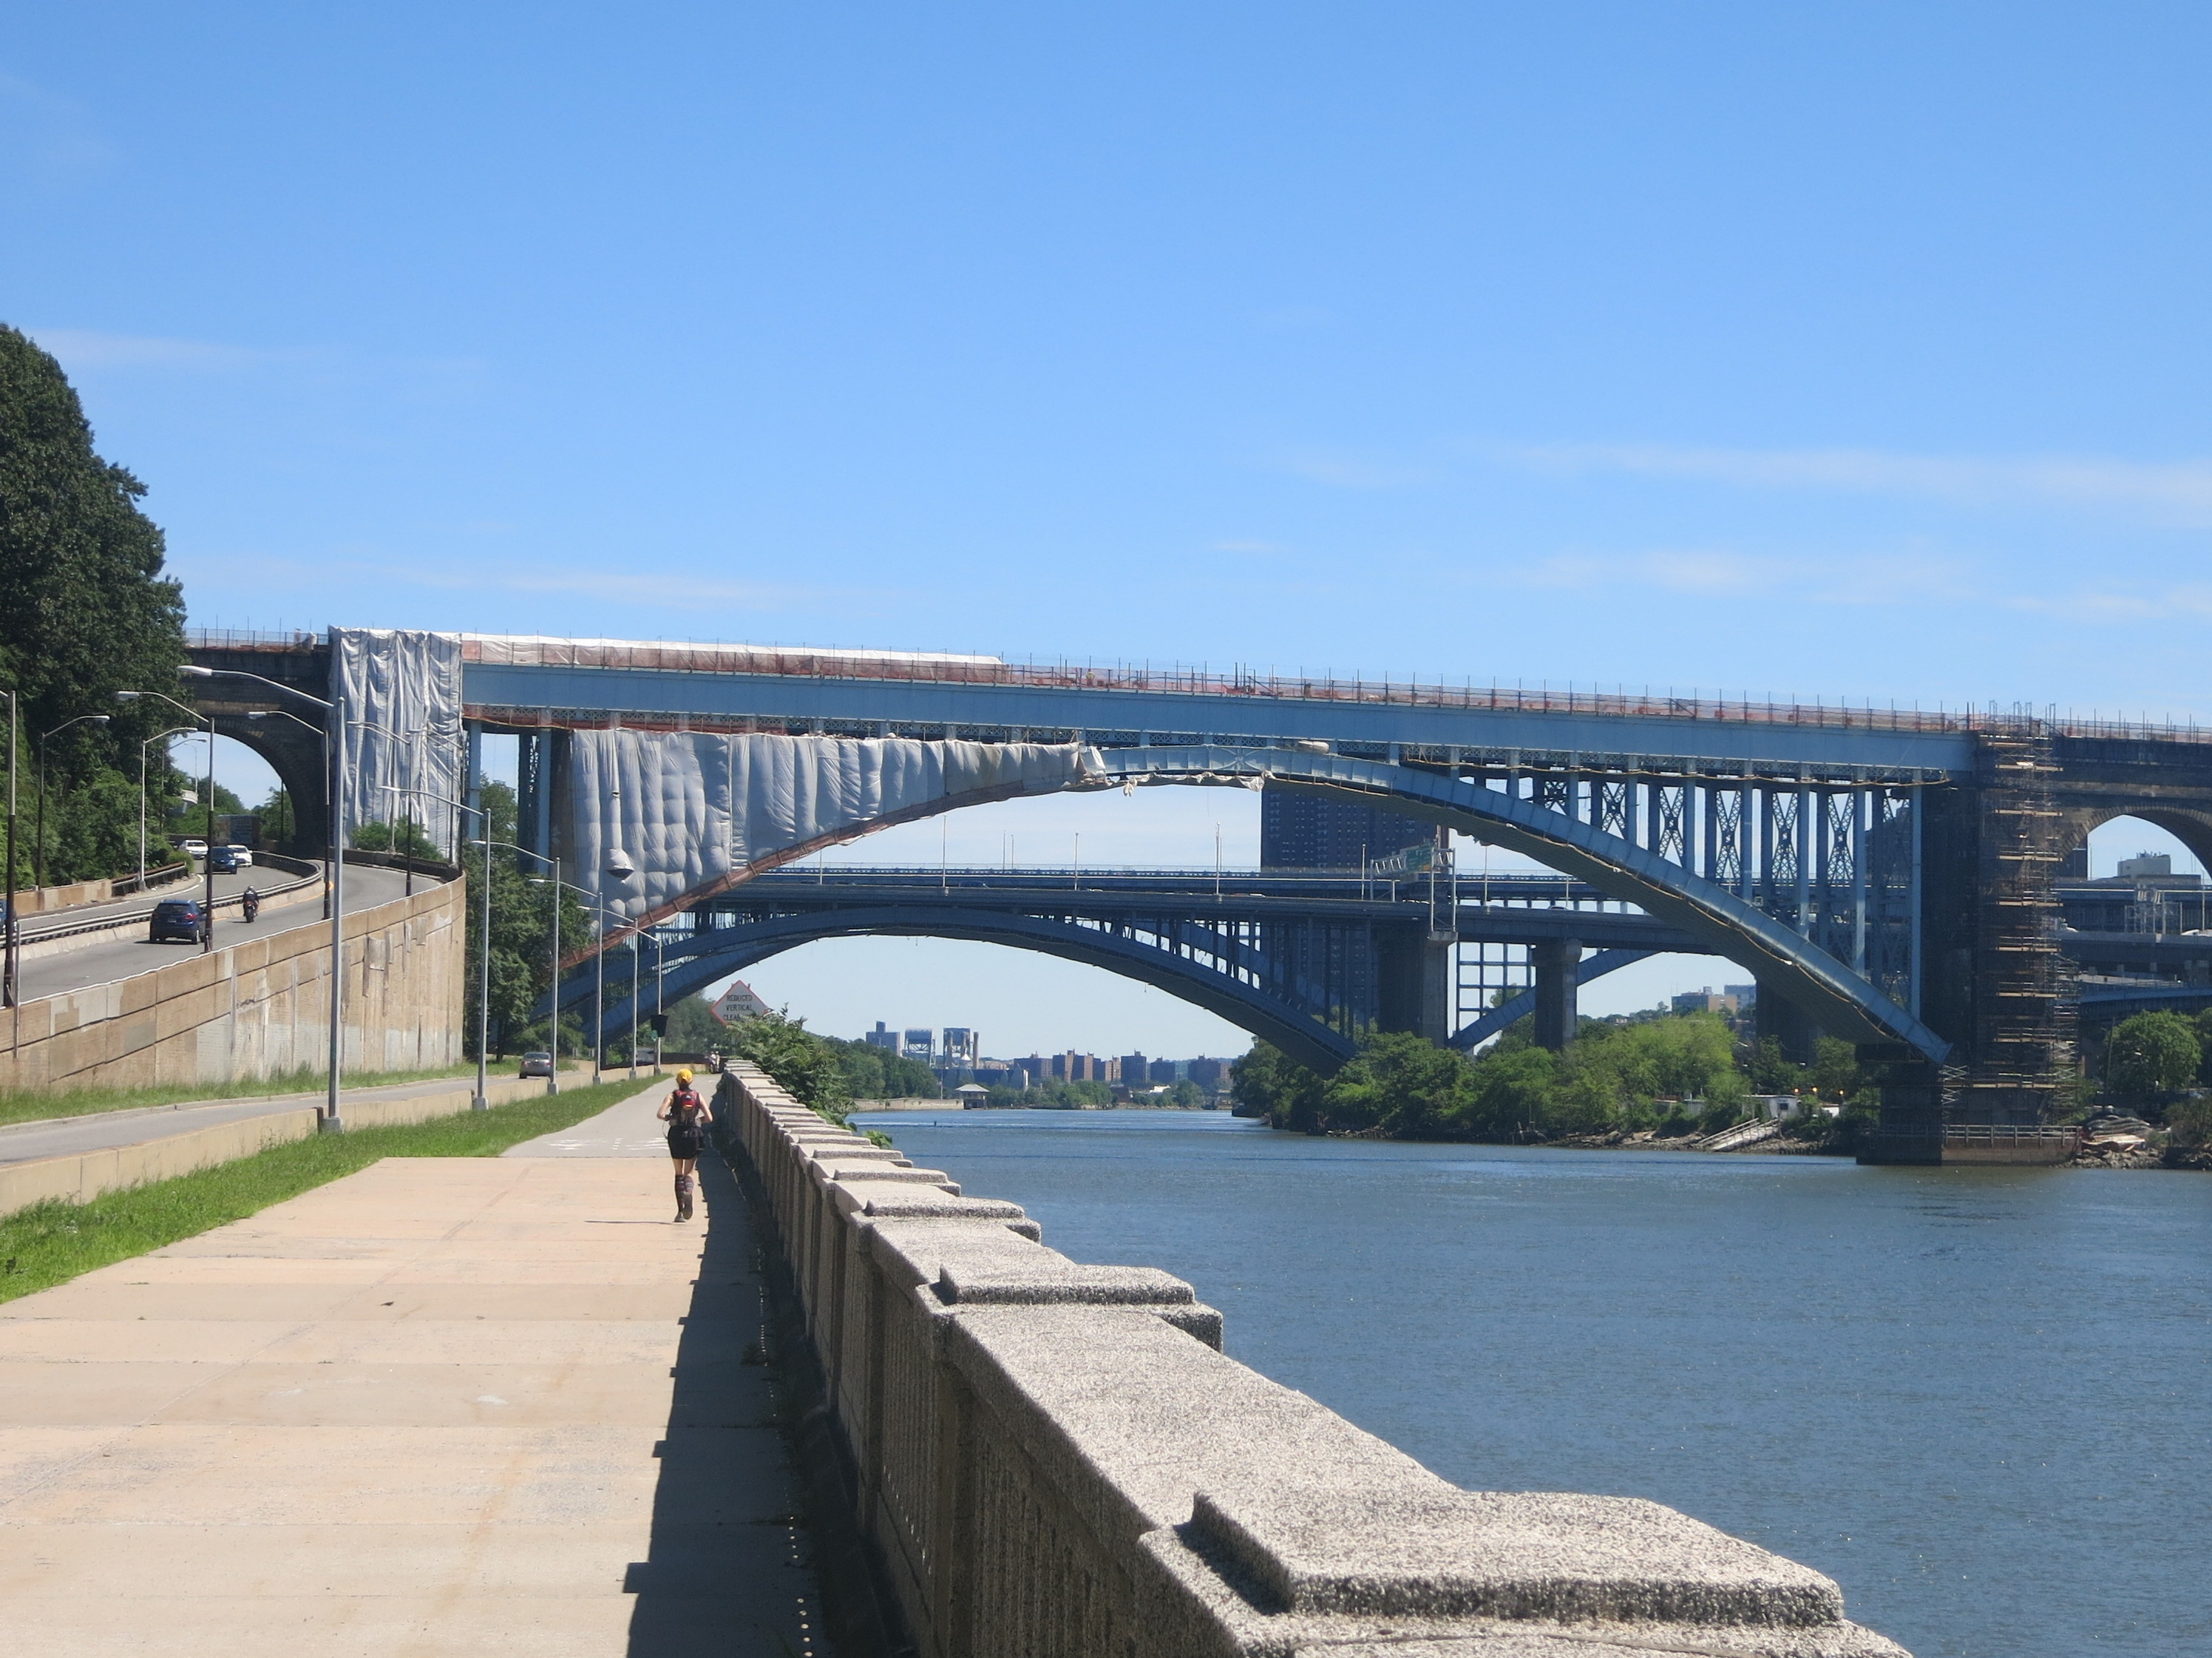
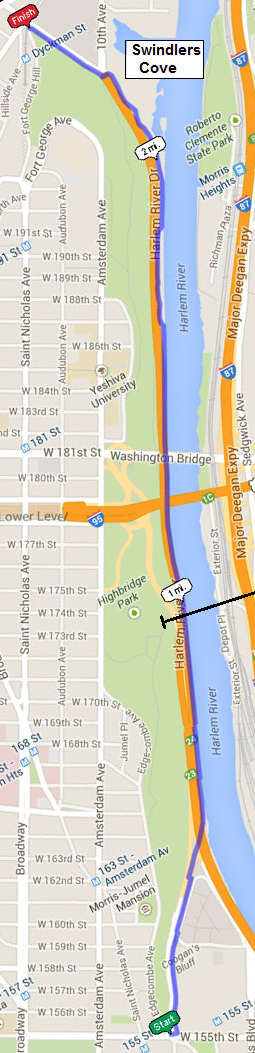
The "Low Road" became one of our regular routes at least as far back as 2007, when we discovered the way down along the Harlem River Drive entrance ramp at 155th Street, and thence to the promenade. This was a great alternative with no hills! And it also led to our discover of Sherman Creek Park, aka "Swindler's Cove". 


As for the "Mid Road" (western sidewalk of Harlem River Drive) I recall trying to find a way to walk around Manhattan sometime in the '70s or '80s (clockwise) and when I got to Highbridge Park, I started south along the sidewalk of the Harlem River Drive at the base of the cliffs, but eventually had to give up and make my way to the top through the maze of highways which cross the park right at its mid section. Then 6 or 7 years ago, Susan and I replicated this exploration, but reaching a dead end, we scrambled up the rock face to the High Bridge's Manhattan terminus.  


A Little History and Why it Matters

The very name "Highbridge Park" speaks of history. The construction of the Croton Aqueduct by the City of New York took
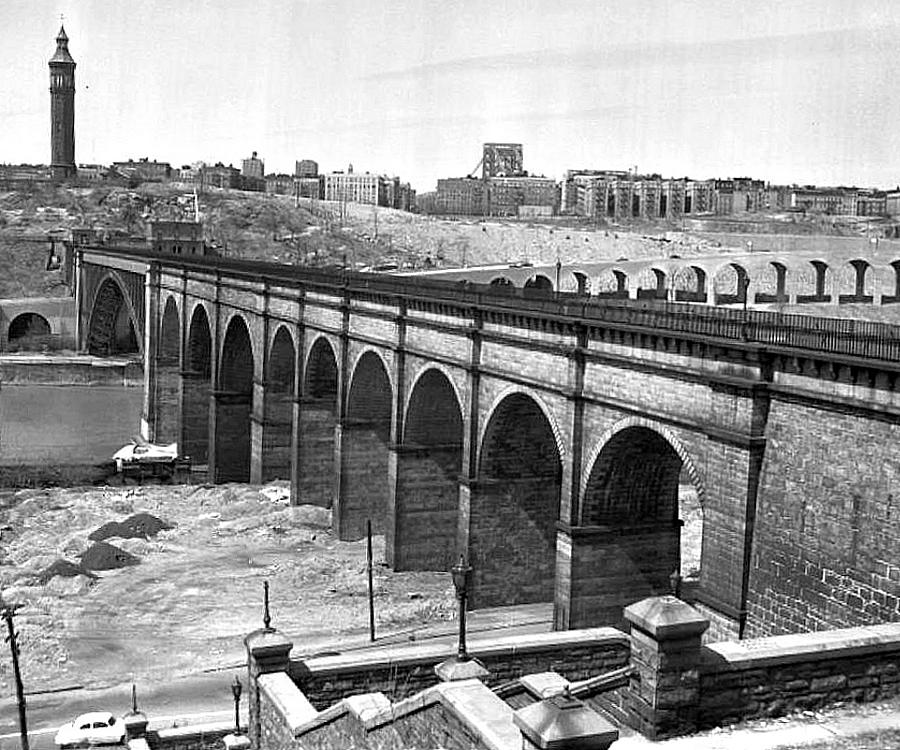
place from 1839 to 1848, and getting the water across the Harlem River was one of the biggest problems. The high arched Aqueduct Bridge was the solution. From the day it was finished, the bridge became iconic — not only functional but beautiful. The series of high arches were reminiscent of ancient Roman aqueducts. It was called "High Bridge" for obvious reasons and the park (first established in 1867) became "Highbridge Park". The picture on the right from the 1870s, shows an artist's rendering of High Bridge, the tower, reservoir and pump house before anything else was built and with both shorelines as yet unspoiled. 

The history of the park continued to revolve around Aqueducts, Bridges and Cars (or horse drawn Carriages). Consider these major public works projects which crossed over, under or through Highbridge Park:
  • 1839 - 1848: The Croton Aqueduct (with High Bridge) was built.
  • 1866 - 1872: the Highbridge Water Tower and Reservoir were built.
  • 1883 - 1895: The New Croton Aqueduct (which crossed under the river) was built.
  • 1886 - 1889: The Washington Bridge was built.
  • 1894 - 1898: The Harlem River Speedway (no bikes, no cars) was built.
  • 1919 - 1922: the Speeedway was paved and motorists were allowed on it.
  • 1927 - 1928: the center 5 arches of High Bridge were replaced by a steel arch span.
  • 1940 & 1950: tunnels from the George Washington Bridge under 178th and 179th Streets were built to the park on the east side of Amsterdam Avenue.
  • 1947 - 1955: The construction of the Harlem River Drive from 125th Street to Dyckman Street replaced the Speedway. This included the arched viaduct from the Drive to the GW Bridge tunnels and viaducts to the Washington Bridge.
  • 1960 - 1963: The Alexander Hamilton Bridge and the Trans-Manhattan Expressway carrying I-95 to the Bronx was built with a myriad of access roads in the park.


The Maps and the Slide Shows

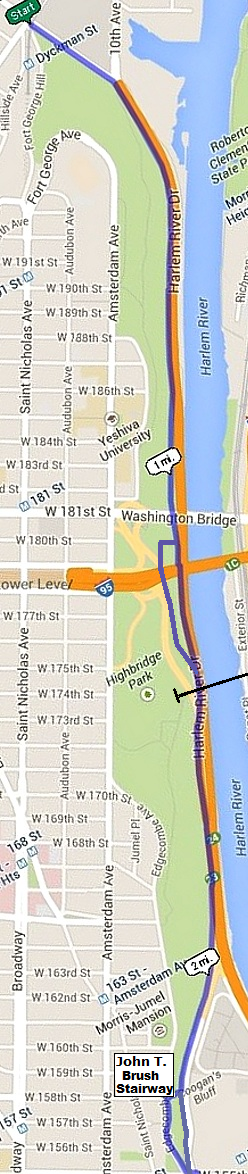
Your ability to navigate these routes and your enjoyment thereof will be enhanced by a little study before plunging straight in. First are the maps. Each of the three routes has a map along the left side of the text. Look at each route and see where it starts and ends and where the path changes direction. Look for detours or possible alternate routes. Then read the text. 

The text is greatly enhanced by the slide shows. The main one for each route is brought up by clicking the link for that slide show (located a bit after the map). In fact the slide show IS the route — the text merely explains a few things. The detour and various alternate routes also have their own slide shows.

So here goes ... enjoy! Then go out and run one of the routes. Even better, run all three!

The High Road: Along the OCA and the North Park Road

High Bridge from the Old Croton Aqueduct

For years, running through Highbrdge Park meant running along the OCA. Period. When we got to High Bridge we would take the path (our "bushwhack") or the stairs up to Amsterdam, and then run along this thoroughfare to the north end of the Park. We would stay on Amsterdam past all the highway bridges, past Yeshiva University and and not even see the park till 188th Street, where we would run along the park for a few blocks. And that was it.  

Then one day in June of 2011 when Susan and I were doing this run, we decided to at least stay on the sidewalk above the park instead of running up Amsterdam Avenue by Yeshiva University, so we took a right just past Washington Bridge on Laurel Hill Terrace. The first thing we found, beside some beautiful views and the fact that Washington Bridge has a nice sidewalk for crossing to the Bronx, was a wonderful stairway down into the park. "Wow, look at that, where does that go?" We didn't go down that time, but later that week I took a trip up there and did some exploring. 

Well, I discovered a park road, very well maintained but seldom used by anyone, that went all the way up to the north end of the park. On our next run up there we took the road and it became part of our regular Highbridge Park run. I call this the north road and on it you get to see the loveliest and wildest part of the park on a gently rolling road with amazing views — and we never knew it.
 

Click for High Road Slide Show


Controlling the slide show: the rate of the progression of pictures is pretty quick (3 seconds). I suggest upping that to 5 or 6 seconds using the control at the bottom, or even progressing manually by using the appropriate control. Read the captions — they're important. And don't forget to kill the slide show window when it finishes, otherwise it will keep looping ad infinitum — and come back here !

Much later, in fact this summer, when I did the "Mid Road" and did some exploring in the middle of the park where all the highways cross, I went up through the arch in the Shaft 25 retaining wall and discovered 1) they are building a skateboard arena right in the middle of the highways and 2) there looked like there was a way up to Amsterdam Avenue just south of all the highways (just past Highbridge Tower). 

Then I discovered that you could link up this path to the top with our "bushwhack" (which we have been unable to do for a couple of years due to construction on High Bridge). Thus the missing link was at last discovered and you can now do the entire High Road without setting foot outside the park! 

The slide show gives a pretty good description of how to get through this mid section, but in very brief: 1) take the path (or for now, take the detour) up from High Bridge, 2) go north (to the right) when you get out of the woods into the field after the bushwhack, 3) go down the stairs when you reach the red brick wall (the detour rejoins the route at this point), 4) thread your way around the skateboard arena, 5) find the path near the top of the Shaft 25 retaining wall into the woods, and lastly, 6) head on this path towards Washington Bridge and loop around down through the arch and up the other side. Now you are on the north road, just before the Laurel Hill Stairway. 

Voilà! You've made it. Need a guide? Talk to me. 

A Necessary Detour and an Alternative Section of the route

Detour: The slide show gives the full route, but right now because of construction, you have to stop when you get to the Manhattan end of High Bridge and take a detour. It's shown on the map and it's no big deal, take the stairs up to the top, swing around the swimming pool and rec. center, and go down 2 blocks on Amsterdam. Then take a right on the road opposite 175th Street, stay on the sidewalk down and to the left. When you get to the fence, go down the stairs and you'll be back on the main route. Here's a slideshow just for the detour: The High Road - Detour.

Alternate Route: There's also an alternate route (shown on the map at the north end) — it goes up to Amsterdam Avenue and ends up on the top of the hill. The regular route goes down the hill and ends on Dyckman Street. If you're headed to the Cloisters you might prefer the upper route. If you're headed to Inwood or the Bronx the lower would be better. Here's the slide show: The High Road - Alternate Routes

The Mid Road: Along the Base of the Cliffs

 
Approaching the Washington Bridge from the north on the Mid Road

The "Mid Road" is a made up name, since it lies between the high and the low. Most of the time it's just on the other side of the Harlem River Drive from the Low Road (which follows the promenade along the river), but it has a very interesting path in the mid section. I did this route north to south when I was putting this report together, but there's nothing special about that direction. 

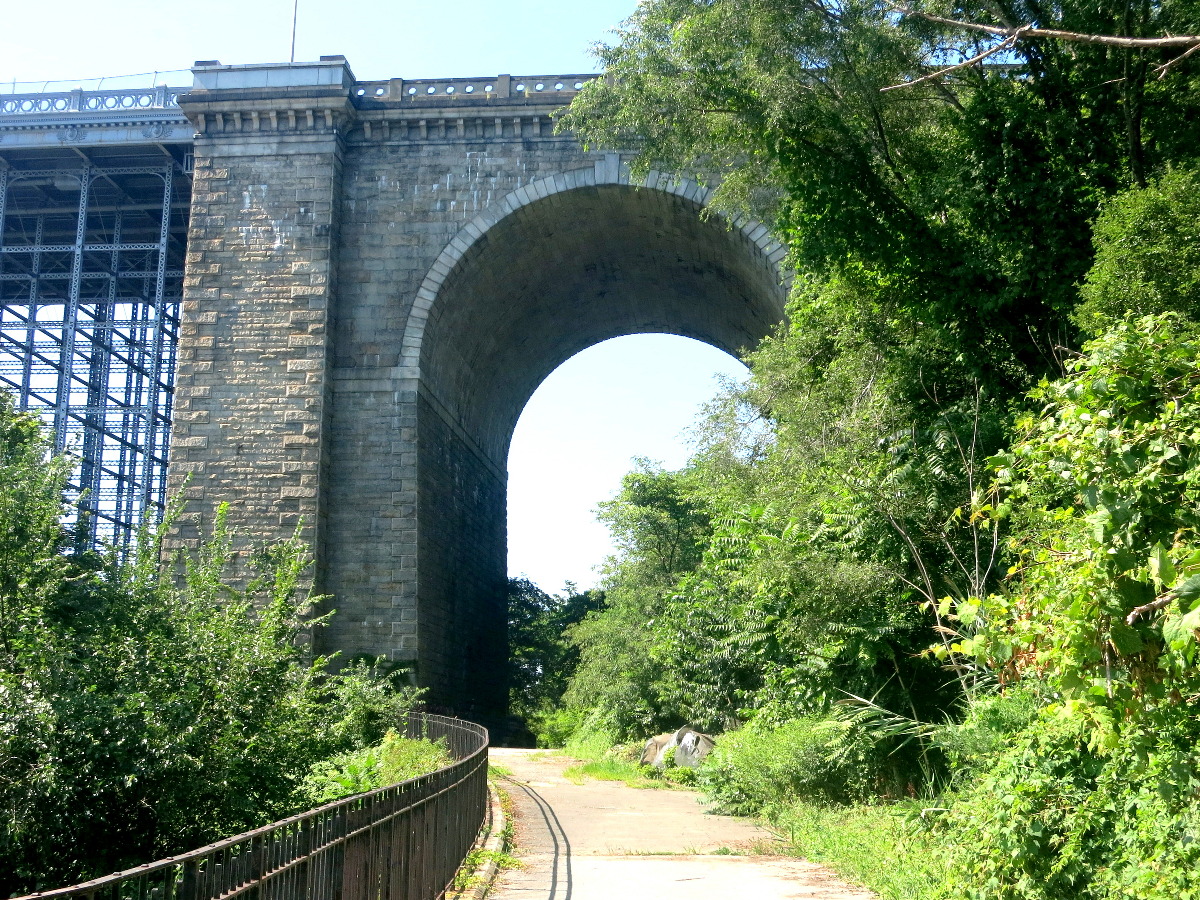
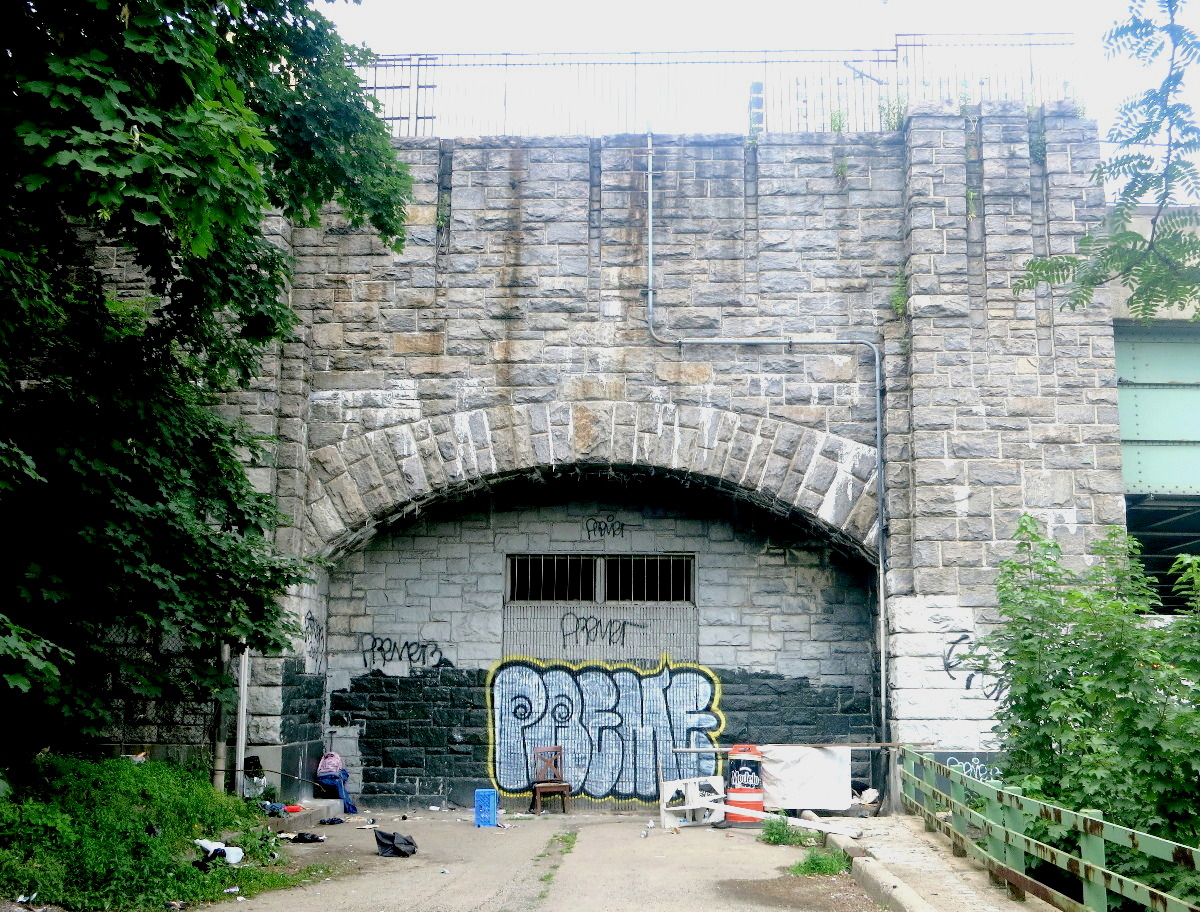
It turns out the New Croton Aqueduct, which went through the park in the late 19th century has a lot to do with the middle section of this route. It seems that in 1896, a landslide occurred when the Harlem River Speedway construction crew did some blasting on the cliff face just south of the Washington Bridge. The full story is related below, but the short of it was that some of the New Croton Aqueduct infrastructure was damaged, and so they had to build a retaining wall along the middle section of the Speedway, and the sidewalk (our "Mid Road") was put up on top of this retaining wall (which was between 10 and 16 feet high). For us, this was a big plus! Furthermore, where the slide occurred, they built a structure to protect some equipment below. This is the Shaft 25 arched retaining wall and you get to it right after you pass through the great stone arch of the Washington Bridge.  

Click for the Mid Road Slide Show


When you get to this structure, the normal route is to go on by it and down the stairs (which appear to never be used) and make your way south along the narrow sidewalk — now at grade level — and continue south to High Bridge along the road. The sidewalk here has been obliterated by a dirt road used for construction, but hopefully in the future it will look a lot better. 

At High Bridge there's a bit of a narrow section and then an overgrown section (see below), but basically you can continue on south with no trouble. The slideshow above will give a good feel for the entire route. 

An interesting alternative to this part of the route


Alternate route: Heading down
on the park road
There's an alternative right in the middle of this route. Just south of the Washington Bridge arch, you pass by a stone structure with an arch in the center. This is the New Croton Aqueduct's Shaft 25 retaining wall (see below). Instead of going down the overgrown stairs to the Drive sidewalk, go up the stairs through the arch. At the top, find your way over and down to the left, underneath the Alexander Hamilton Bridge. Get on the well maintained park road which will take you to the bottom where you can rejoin the main route. This alternate will give you a chance to see the middle of the park with its myriad of highways, overpasses, exit ramps, entrance ramps and assorted mayhem. The alternate route is shown on the map. Here's a slideshow just for this portion: The Mid Road - Alternate Route
 
Once you get to High Bridge, either along the highway or by using the alternate route, go under the foot of the bridge on the narrow sidewalk (beware of construction litter) and keep going under the viaduct (more on this below) and then fight off the overgrown bushes which make the sidewalk about 12 inches wide. Some folks have been known to think there is no sidewalk here at all! 

Once in the clear, it's a straight shot all the way to 155th Street with the last portion up along side the entrance ramp. 

A Side Trip up the John T. Brush Stairway and a look aound Coogan's Bluff


There's a nice surprise when you get near the end, a little ways from the top of the ramp that leads to 155th Street. It seems the New York Giants (the baseball team) built a stairway down the rocky slope so Washingtoon Heights residents could take a short cut to the Polo Grounds (here), the Giants' home field . They named it after John T. Brush, their owner who had recently died. The Parks Department just rebuilt it and made a lovely little picnic area at the bottom. I explored the area and took the stairs up to Coogan's Bluff (huh? See this). And if you follow the slides show, you can too! Here it is: The John T. Brush Stairway and Coogan's Bluff You'll end up on Edgecombe Avenue, a couple of blocks up from 155th Street. I think you will agree that this side trip is more interesting and attractive than those last 3 blocks up the hill on the main route.


The Low Road: The Harlem River Promenade

Starting south along the Harlem River
I  did this route with Melissa in June of this year as part of a longer run and most of the pictures in the slide show are from that run. To get to Highbridge park, we took the Willis Avenue Bridge across to the Bronx, through a couple of parks, past Yankee Stadium and it was all pleasant going. When we crossed back into Manhattan at 155th Street, we decided take the low road since the last time we did this run, we took the high road. You'll see at the end of the section below (the "Shaft 25 Retaining Wall") how lucky we were to take this route on this particular day.

This route is probably the easiest, and it has beautiful up-close views of the river. When we did it, late spring flowers were out and the whole thing was very, very green. But do watch out for the occasional Poison Ivy. I have almost always done it south to north, usually on the way to the Bronx (such as Wave Hill or Van Cortlandt Park) or the more northerly parts of Manhattan (such as the Cloisters or Inwood Hill Park). Except for the down-ramp from 155th Street (which, of course is an up-ramp if you go the other way), it's as flat as a pancake.

 Getting on the route


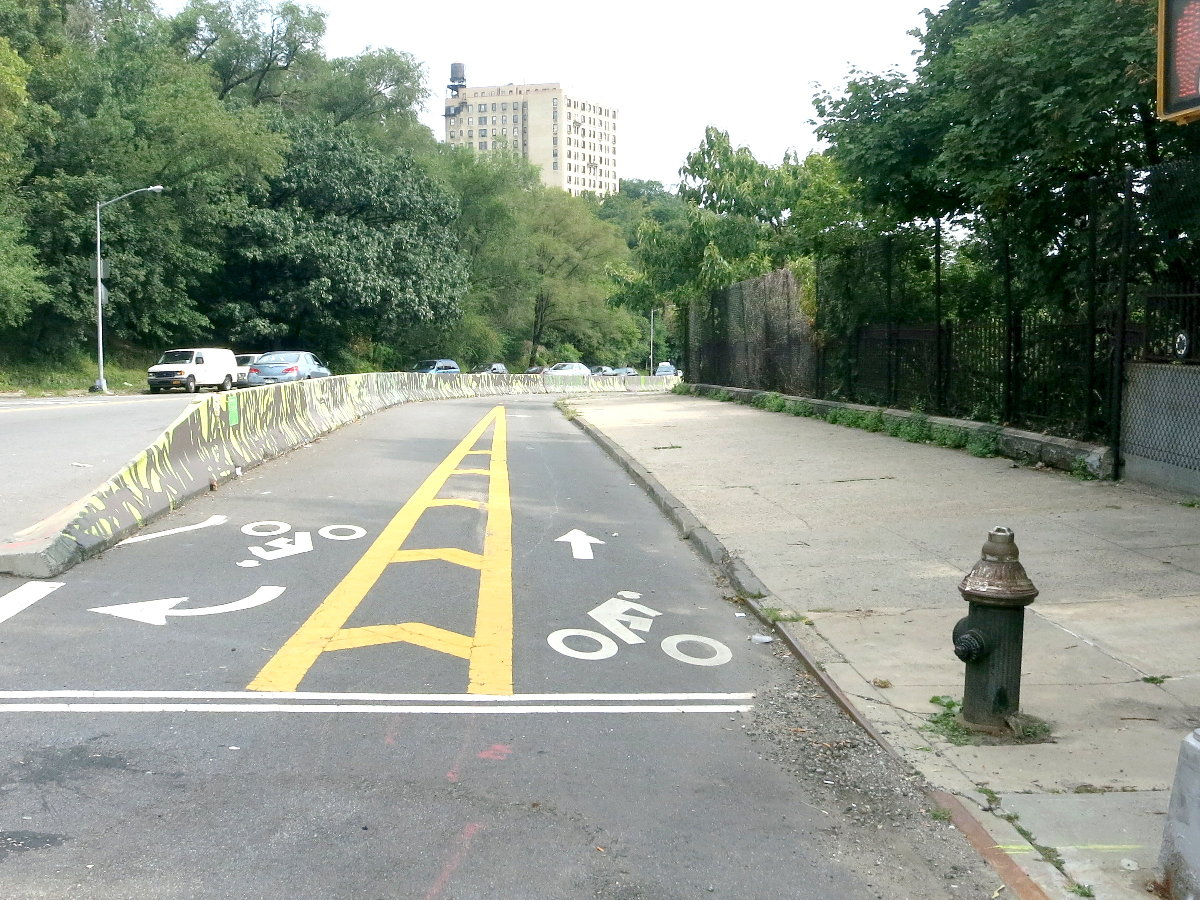
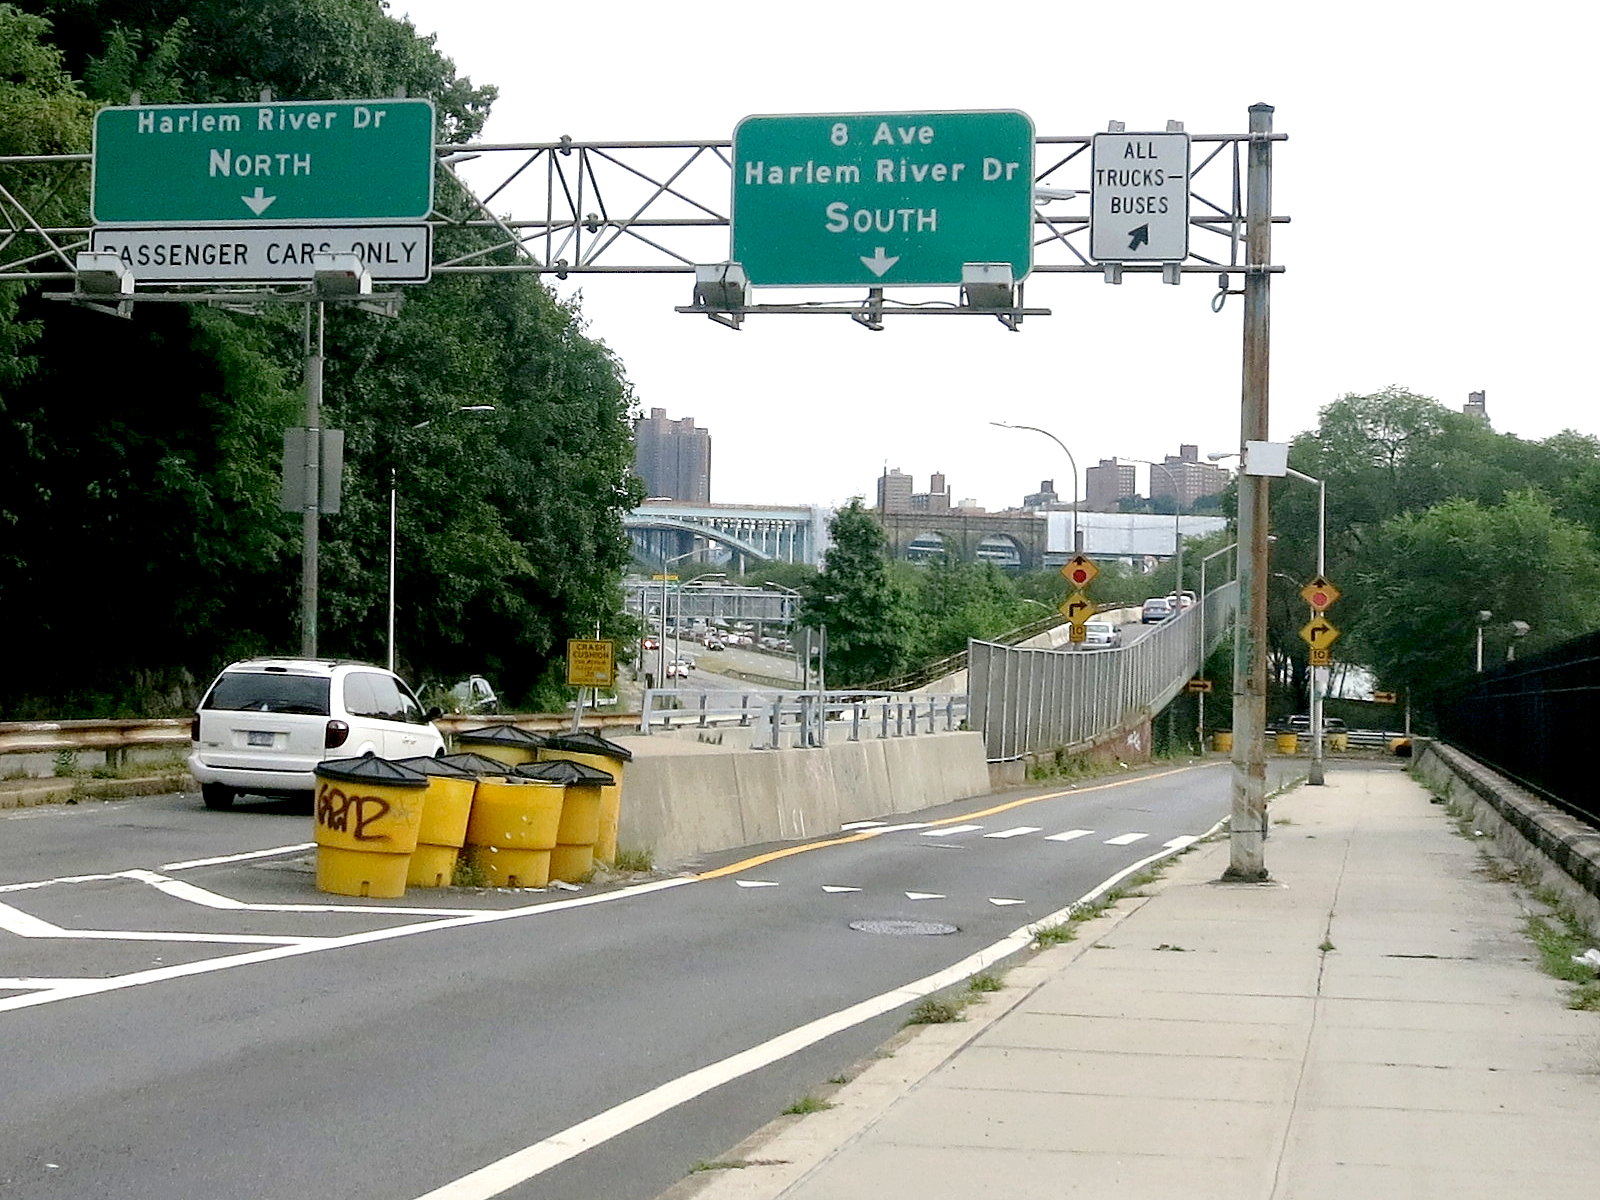
If you've never done this route, here's how to get started. From the corner of Edgecombe and 155th Street, cross to the east side of the ramp that heads down to the Harlem River Drive. This is the downhill side and it's right where the sidewalk on the bridge to the Bronx begins. The picture on the left shows the spot. Click on the photo for a larger version. Stay on the sidewalk — leave the bike lanes for the bikes.

Proceed down the hill till you see the start of the ramp in the center of the road which gets you over the Drive to the shoreline. Cross on the crossing to the pedestrian walkway which is on the side of this overpass. See the picture on the right. Follow this all the way over, around and down and you'll soon be on the Harlem River Promenade. 

 Click for the Low Road Slide Show


The photos I took show the entire route including the above-mentioned down-ramp from 155th Street, and the straight shot along Dyckman Street over to Nagle Avenue. Make a note of photos #10 and #11 which show water gushing out into the Harlem River. This was quite a mystery to us since it looked perfectly clean and couldn't well be just run-off. Curiously, on the other side of the road (see photo #12), we noticed a structure on the side of the cliff which I had seen quite a few times and I thought I knew what it was — but it turns out I didn't. So what's going on? See below where it's all explained. 

Of the three routes, this one is the most straightforward. Once you're on the river, there are no turns, detours or alternate routes.


A side trip to a little gem of a park

There is one side trip just before you get to Dyckman Street that you really ought to check: Sherman Creek Park, aka Swindler's Cove (see the map).

This is a pet project of the New York Restoration Project, a terrific group which has "adopted" a number of neglected northern Manhattan and Bronx parks. Sort of like the Central Park Conservancy for 5 parks and little or no budget! For some background, see this.

This little enclave includes a boat dock, some wetlands and lots of natural areas packed into a small space. It also has some bathrooms and a community garden. An amazing and lovely oasis, well worth 15 minutes of your time.


A couple of Historic "Artifacts" of Interest to the Runner

In the course of this report, I mention "bumping into" this or that structure that was originally built in the past, sometimes the long past. Although you, the runner, can ignore these with a brusk "whatever!", some of you may want to know a little more about what these things are and what they're doing in a park. Of the list I drew up at the top of this report giving dates for major public works projects, let me single out two of them for a bit of study: the 1890s Shaft 25 retaining wall (part of the New Croton Aqueduct), and the 1940s arched viaduct (part of the Harlem River Drive project). 

A Few Words About the "Shaft 25 Retaining Wall"

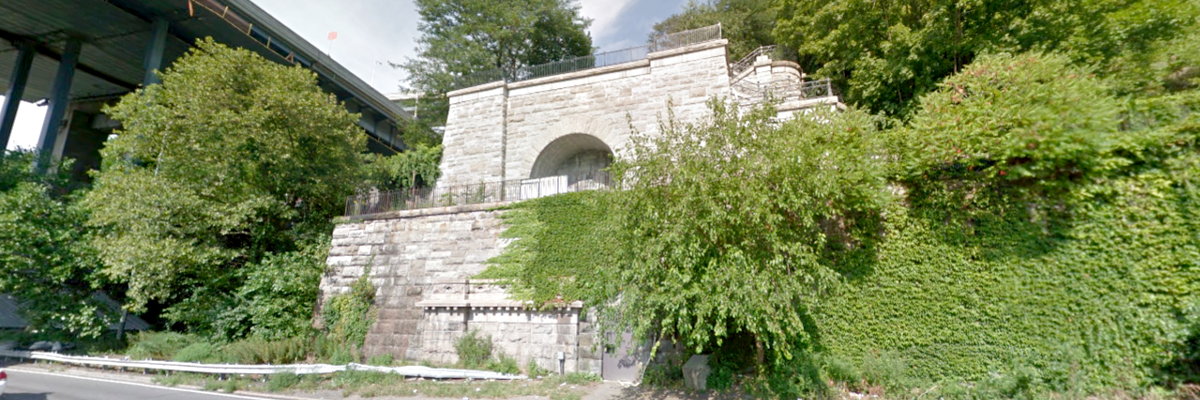
See that stone structure in the picture. Ever notice it? Here's a hint: this shot was taken from the far side of the Harlem River Drive and it's just north of the Alexander Hamilton (I-95) Bridge which is in the left corner of the picture. You might have been running along the river promenade or driving along the Drive on your way to points north. Or you might have gotten a glimpse of it if you were driving on the Deegan on the Bronx side of the river and happened to look in this direction. 

I always wondered what it was and where that arch went. When I read somewhere that there once were a pair of tunnels built in the 1940s that went across Manhattan to take traffic to and from the George Washington Bridge, I though this must be the end of one of the tunnels. Notwithstanding the difficulty of getting traffic to and from this point, that idea stayed in my mind for years. But I eventually (with the help of Google) found out just exactly where in Highbridge Park those tunnels ended (see below) — and it is not here! Years ago on a run with Susan we went right by the front of this thing and I recall that 1) the back of the arch was just a stone wall — the arch didn't seem to lead anywhere, and 2) there was a sealed door of some sort on the right side of the archway which might have shown me what was inside, but that was as close as I got. So we ended up scrambling up the cliff face near the High Bridge — but that's another story!

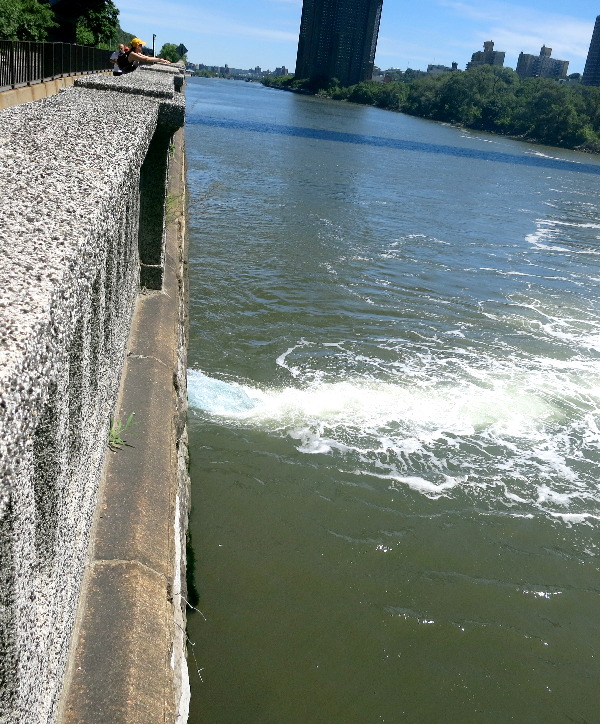
Well, I found out what this thing is and what it's doing here. Our part of the story began when Melissa and I were running along the river this June opposite this thing and noticed a large gushing of water — very clean water — that was flowing into the river from some sort of pipe down at the water level. Melissa said "Maybe the water outflow has something to do with that thing over there". That was the trigger, and some extensive Google sleuthing got me to the answer. The pictures on the left help tell the story. 


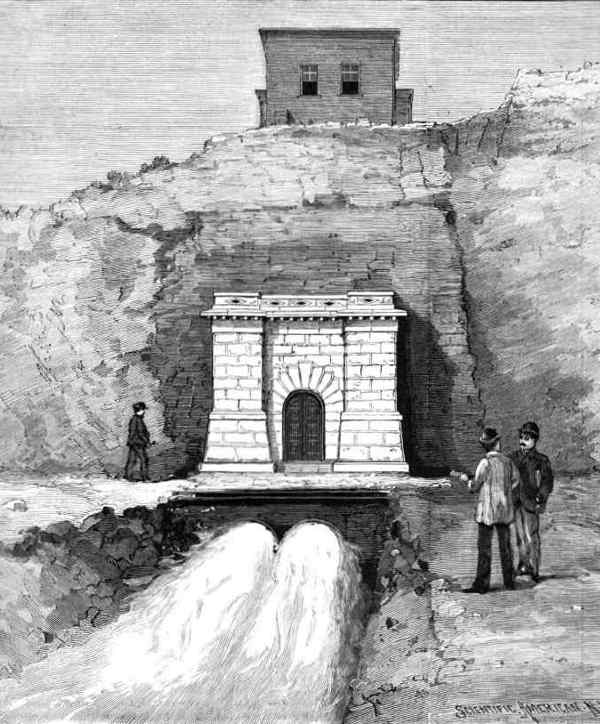
The picture of the water gushing out (left) shows what we saw in June. Now we will jump back to the 1880s. On the right (below) you'll see a little diagram that was drawn in 1887. It shows a cross section of the river and to the left, two shafts going straight down. These were built to let the workers get down to work on the aqueduct. The shaft closest to the river is "Shaft 25". It was the largest shaft on the aqueduct, being 16½ x 33 feet in cross section, and It
went down 426½ feet below ground and was excavated in 1885-1887. This was pretty tough work where the main tools were pick and shovel and dynamite and it took many men working two 12 hour shifts a day for years to get it done. Here's a contemporary photo of Shaft 25 under construction: here. At the top of the shaft a building called the "head house" (here) was constructed where pumps and valves and other equipment for the system was housed. Notice that at the water level there is a horizontal shaft from the river that goes back to shaft 25. It's called a "blow-off" and it's vital to the operation of the system. The blow-off allows excess water to be dumped from the aqueduct (under pressure) into the river. 


From Scientific American, 1890
The original plan, 1886

The next two pictures (above) show renderings of what this system looked like in the late 1880s. The building on top is the head house, the little archway provided access to the blow-out pipes and valves and the pipe outlets at water level let out the water, and it was evidently working by the early 1890s. 


But just about that time, some Robert Moses of the day decided a roadway should be built along the shore using rock from the cliffs for a foundation. What's the harm from a little dynamite? And it was not just a roadway, but it was dedicated to horse racing by the city's elite. Thus was born the Harlem River Speedway. 

The Harlem River Speedway circa 1890s.

Then on January 27th, 1897, the whole rock wall in front of Shaft 25 came tumbling down when the roadway construction crew was doing some blasting near Shaft 25. As you might expect, this did not amuse the Aqueduct Commission, not least because Shaft 25 was one of the most critical points along the entire aqueduct. 


So it was back to the drawing boards. Three things were done: 1) the blow-off pipes had to be extended across the Speedway to the new shoreline. 2) a retaining wall had to be built to forestall any future slides and to protect the roadway at the base of the cliff. The sidewalk had to run atop this retaining wall, and 3) Another retaining wall was built to protect the blow-off vault (which was now behind lower retaining wall) from rocks tumbling down from above and to stabilize the upper part of the rock face to protect the shaft itself. The arch in the center stood over the blow out vault and stairs rising to the upper levels were embedded in the right abutment of the arch and another stairway led down to the blow-out vault below from the left abutment (now bricked over). Here's a page from the 1905 report to the Aqueduct Commissioners explaining the whole thing (this). They seem to have left out all the yelling and screaming that must have occurred.  
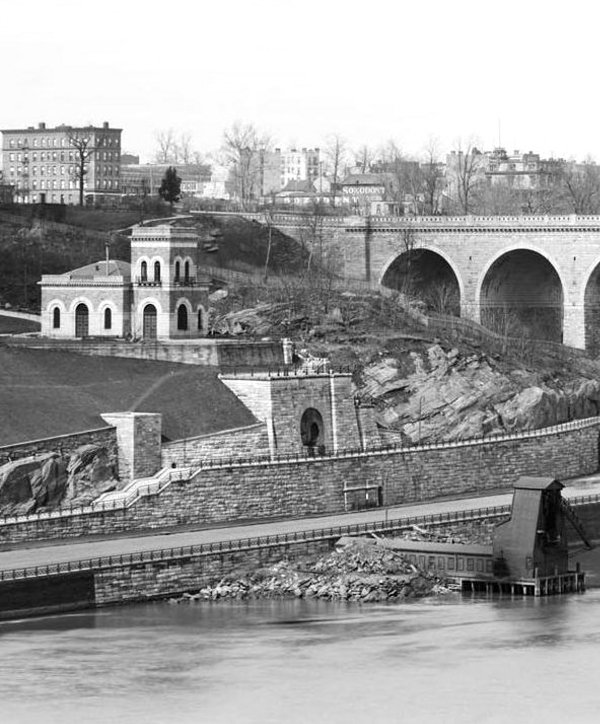
After the "do-over". A retaining wall and raised sidewalk, another retaining wall above that with arch to protect the "Blow-off" vault.  Photo from 1905.

The next picture (above), from 1905, shows the finished layout after all these jobs were done. So there is no tunnel or hidden chamber behind that arch, just the crumbly rock face, and behind the door we found years ago was just a stairway (see the slide show for the Mid Road alternate route) to the upper regions that for some reason was off limits that day.

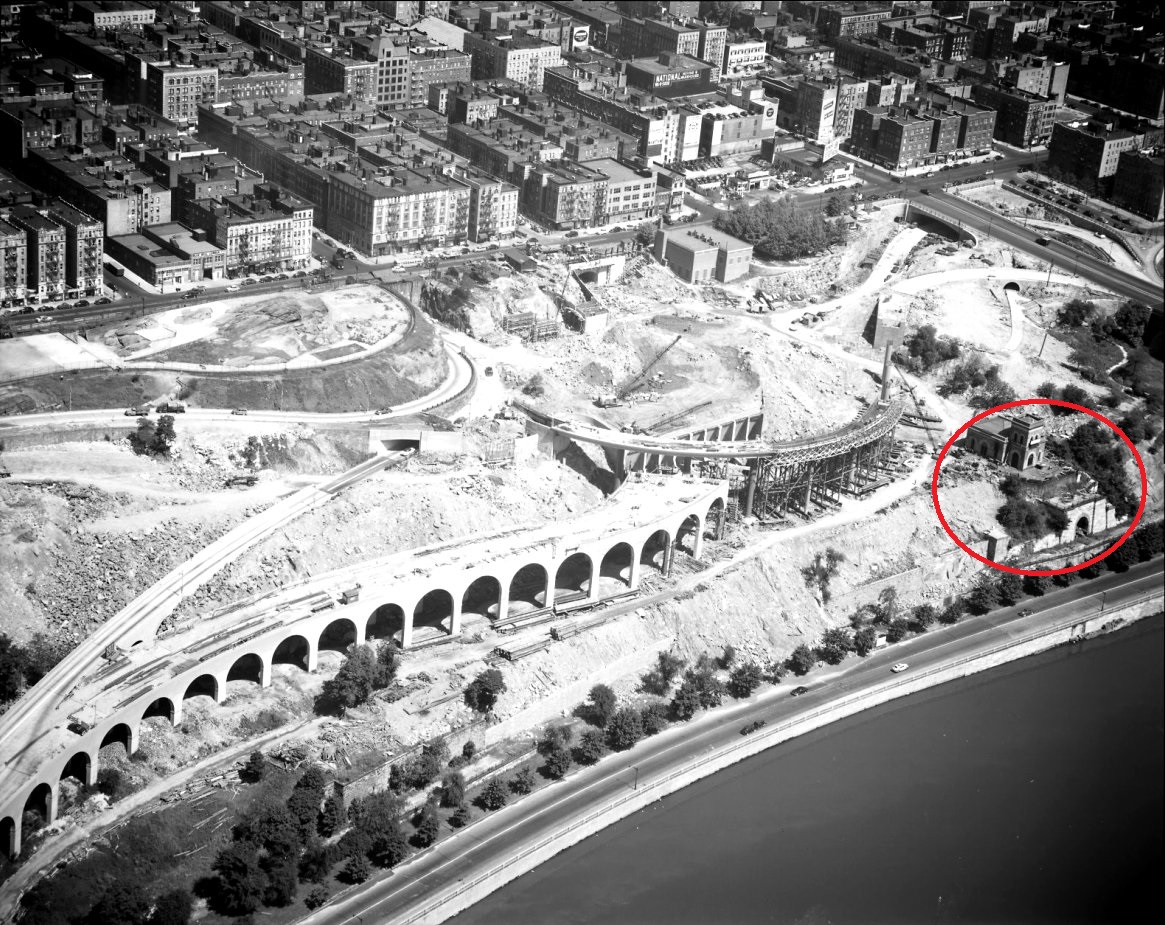
Today the head house is gone (lost in the building the Alexander Hamilton Bridge) and access to the shaft is made by removing some concrete slabs where the head house once stood. The arched retaining wall with the winding stairs still protects the blow-off vault, but is otherwise left for us runners and walkers to wonder about. And it's ironic that building a roadway led to the initial problems, and building 20th century roadways have changed this whole area so the original Aqueduct Commissioners would hardly recognize it. Just check out the 1951 photo (below) to see what the 20th century Robert Moses can do to what was once a wild and beautiful place! "Our" head house and arched retaining wall are fearfully huddling in the lower right of this wasteland. 
Construction Destruction in the park in 1951

But every so often, the water supply people need to flush this 150+ year old aqueduct, and thus on one Saturday morning in June, some workers, unseen by us, went into the old blow-off vault, turned some valves, at let the water flow. And only Melissa and I knew.

A Few Words About the "Arched Viaduct"

The so-called "Arched Viaduct" was built in the 1940s when the Harlem River Speedway — basically a scenic drive on the order of Riverside Drive — was being converted to the Harlem River Drive, a limited access highway. At the south end, the Drive was extended from 155th Street all the way down to 125th Street where it connected to the FDR Drive. To the north it went all the way to Dyckman Street — using most of the old Harlem River Speedway intact, including the long ramp down from 155th Street.

178th Street Tunnel
But the most disruptive feature, as far as Highbridge Park in concerned, was a long sinuous viaduct which carried 4 lanes of traffic up from the Drive to Amsterdam Avenue where it provided access to the 178th Street and 179th Street tunnels which took traffic across Manhattan to the GW Bridge (yes, and unbelievably, the tunnels are still there!


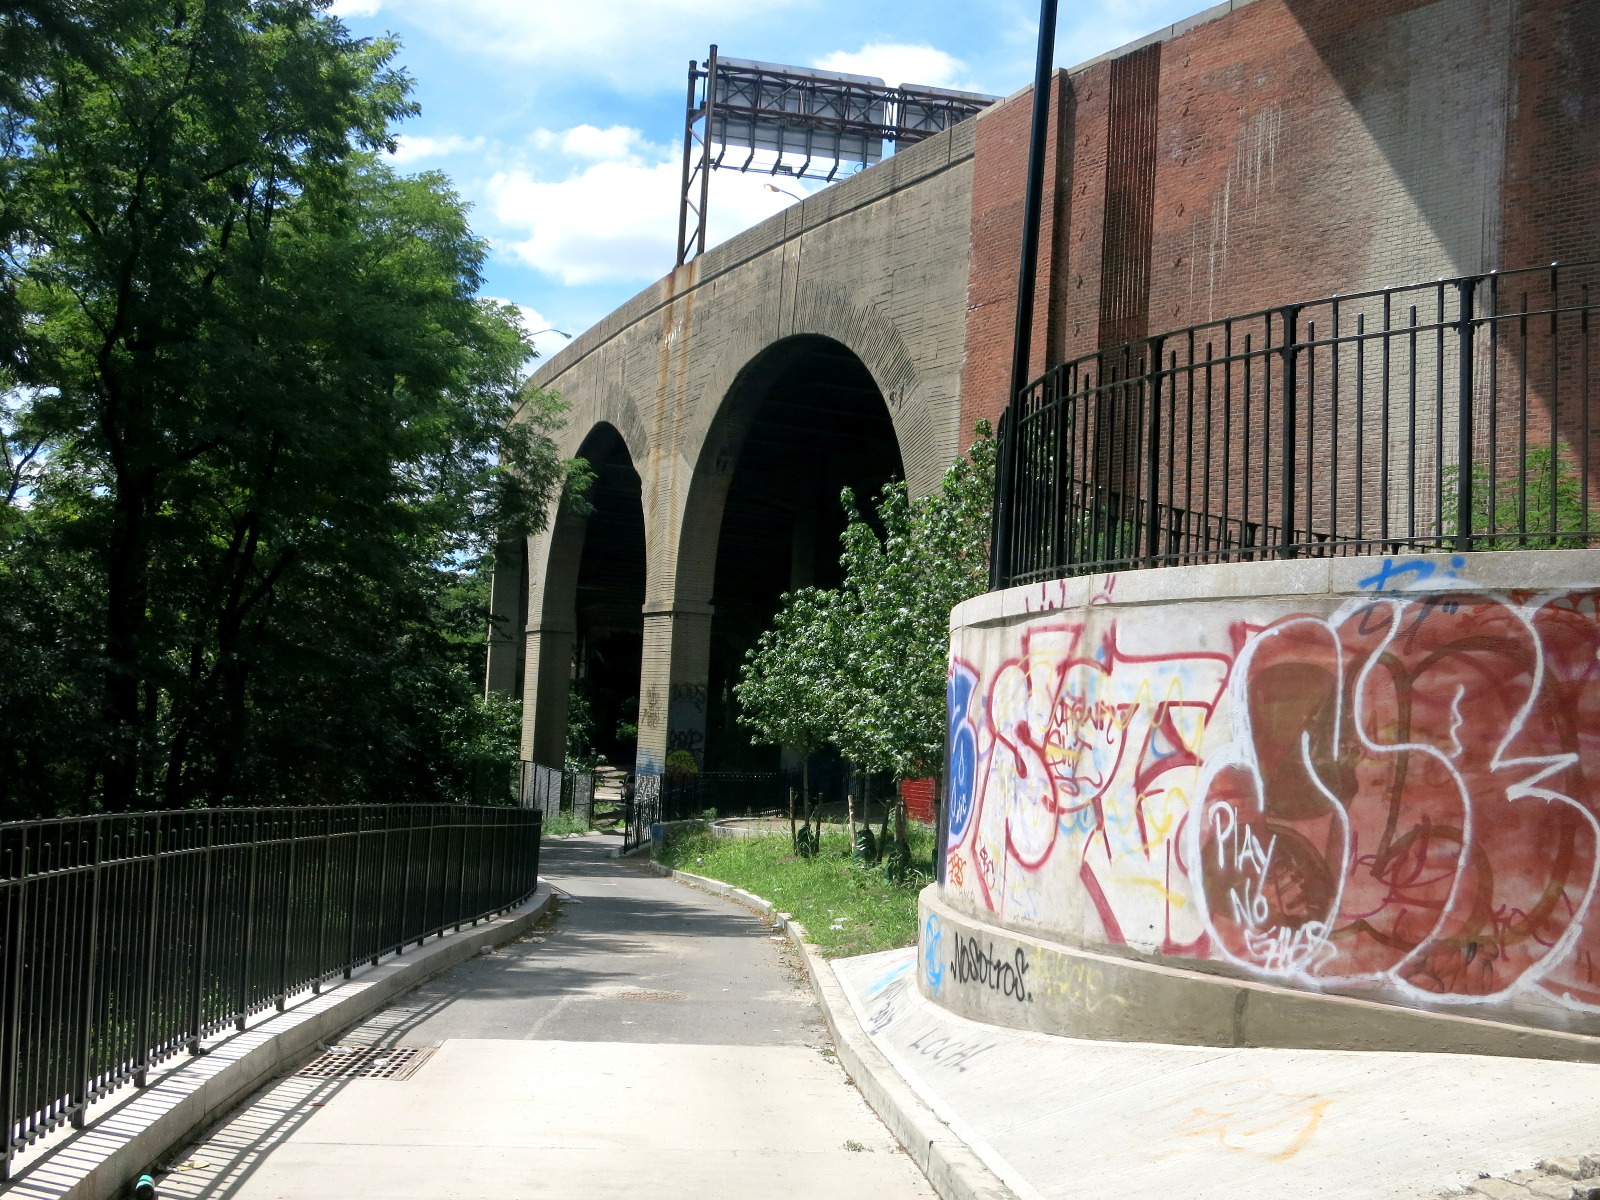
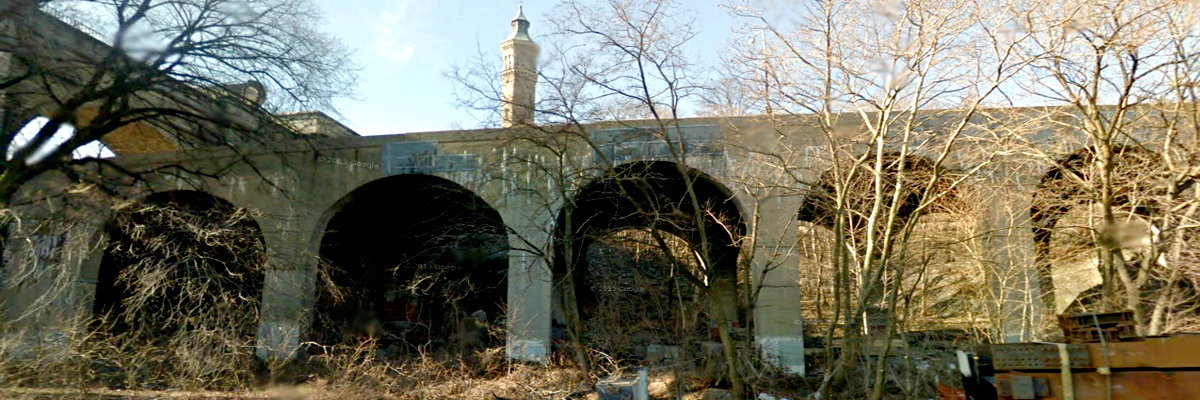
Its structure consists of a series of brick faced arches, very distinctive, and unlike almost any modern highway construction. It almost looks like a giant Roman aqueduct, except it goes up hill! My best guess is that the engineers and architects were trying to emulate the look of High Bridge, which crossed the River on a series of arches. 

The lower end of this viaduct starts right at the base of High Bridge and in fact the viaduct goes right through the westernmost arch of the bridge. Suffice it to say that it does NOT enhance the beauty of the bridge or the park. 


Arches behind arches. View from Bronx side, 1952
Look at the picture above.  It shows largely bare ground north of the High Bridge with the viaduct snaking itS way up to the right. The Alexander Hamilton Bridge was still 10 years in the future.

Trees in place of arches. View from Bronx side, 1900

Now look at this  picture. This is the same scene in 1900. Besides the viaduct, the big differences are 1) High Bridge has all of its arches (the 5 arches over the river were replaced in 1928 by a steel arch span and 2) THE TREES! What happened to the trees in 1952? I hate to say it, but that whole area was cleared for the construction project (more like destruction project) that included the arched viaduct and the various connecting roads to the tunnels and to the Washington Bridge. I found this aerial taken in June of 1951 (here – note: photo is zoomable). It shows a huge construction project which stretches across almost the whole park between High Bridge and Washington Bridge. 

It's interesting to note that the viaduct first went up just to the 178th St. tunnel which was the only one there for 10 years. You can actually see traffic on that section in the picture. That original section of the viaduct was eventually demolished to be replaced by the more elaborate system under construction in 1951. You can see the stub of it in modern pictures, such as on Google Earth (here). And here's a rare 1947 aerial picture showing the other end of the 1940 tunnel at the Manhattan end of the George Washington Bridge (here– note: photo is zoomable). It shows the center two lanes heading underground at what looks like Fort Washington Avenue. Remember, from 1940 to 1950 this tunnel accommodated 2 way traffic. And if you look closely, you can see High Bridge and the arched viaduct in the distance to the east. 

When the other tunnel (179th St.) was completed in 1950, additional access roads were built as shown in that 1951 construction picture. One complication was that the tunnels were now one way (178th Street eastbound and 179th Street westbound). See (this) for an annotated version of the picture. Robert Moses must have been jumping with delight! And, as we know, it didn't end there. Within a decade, the Trans-Manhattan Expressway and the Alexander Hamilton Bridge were under construction. Its access roads, which sprawl like the snakes of Medusa's hair on both sides of the river, further despoiled the park. 

And with that picture of Robert Moses Medusa, we say goodbye.


Papa Bear


This post is adapted from a report on Papa Bear's web site: Beyond Central Park: Exploring Highbridge Park .

Read more...

Friday, September 5, 2014

Running with Pork Chop

Lindsay M
For those of you on the run (pun intended), here’s a little about me: I’m originally from Toledo, Ohio, and have been living in NYC for the last three years. I live with my husband and my dog/side-kick, Pork Chop.  

After working for a large architecture firm for more than seven years, I left in March to start my own business. I now run Lindsay MacRae Interiors, LLC, a residential interior design business. I love it. I also love animals and hope to one day volunteer full-time for an animal rescue group.
Visiting an elephant sanctuary in Thailand!
For the full story:

My running career started in junior high school. My best friend convinced me to join the cross-country team with her. I never liked running and was an overweight pre-teen (with braces and huge glasses!). I still gave it a shot, but I struggled. I was teased by some high school boys. I quit the team and swore to NEVER. RUN. AGAIN. 

It’s OK! Things got better.

Years later, I studied architecture and interior design at the University of Cincinnati. One summer, I landed an internship at Walt Disney World in Orlando, FL. I loved working there and my internship turned into a seasonal job. As soon as I graduated, I left and moved to Orlando. That’s where I put my hard-earned college degree to use –– by working in a theme park (my parents were not amused) for nearly ten years. I had the amazing opportunity to perform in parades and shows and make magic for thousands of park guests on a daily basis. I will neither confirm nor deny which roles I played but I will say that I dressed up and lied to a lot of children. And yes, the summer heat was brutal!

Here’s one of my Disney pals
Loooong story short, I moved to NYC in 2011 for a guy who, luckily, is now my husband. We got engaged and wedding planning was coming along until my first dress fitting. It was awful. My dress didn’t fit. I hit a Weight Watchers plateau and I was getting married in less than three months. I knew it was time to start running. 

I put Pork Chop in a running harness, and off we went. At first I could not even run the 1.7 lower loop of Central Park. I instantly had cramps and couldn’t breathe. I was the slowest person in the park –– everyone passed me. Everyone. Poor Pork Chop wished his owner wasn’t so slow. I got some running tips from my brother and eventually I had run a full mile without stopping. I celebrated with a pair of Lululemon running pants. I basically continued running because of how good I felt in them.
A few months later the dress fit
Me 'n' Mickey
It was around that time that a lot of my Facebook friends started running Disney races. I had NEVER considering running a race, but if Mickey Mouse was hosting one then I was in. Period.

I started training for the WDW Half Marathon by signing up for a race in Central Park. It was a 4-mile run and I was afraid that I would be the last person to finish. I soon realized that races were super-fun and the energy of the other runners and high-fives from the crowds made me run much faster. I ended up finishing the race with a pace of 9:35. After that I was hooked – you know how it goes.
Ted Corbitt 15K - This was a cold race!
Last year I completed my 9+1 requirement for guaranteed entry into the 2014 NYC Marathon and am now training to run the NYC Marathon in November. I am excited and nervous. I decided to join a running club to help prepare for the marathon. Also, I needed a run buddy that wasn’t a 4-minute miler like Pork Chop.

Pork Chop training on his treadmill (he paid for it himself –– no, really)
I had my eye set on a couple of running clubs and was hoping to fit into one that had a dog in their logo or pink singlets. A friend suggested that I try the Flyers even though their color was red.

Yep, That's Me (With Some New NY Flyer Friends :)!
2nd From the Right, Helping Lead the 10 Minute Per Mile NYRR Pace Group
I went to a couple of Saturday runs and found that the Flyers were the friendliest bunch and had a lot to offer. I bought a Flyer singlet to get free beer on a third Thursday and figured it was time to officially join the club. I am happy to have found such a nice group to run with, and even raced in the Club Team Championships in my Flyers singlet in August, and then served as a pace leader for the Flyers at the NYRR Long-Training Run #2. 

-Lindsay M

Blogmaster's Note: As Lindsay mentioned, she's an interior designer, and if you're curious to read about that side of her life or are in need of some design help, you can click HERE to view her website.

Read more...

  © Blogger templates The Professional Template by Ourblogtemplates.com 2008

Back to TOP